Lelylan Lab

Learn how to control and monitor your lights from mobile, tablet and desktop.
15 minutes | $36 (eth) or $44 (WiFi) in hardware | basic level

Hardware

For this tutorial you need a Raspberry Pi connected to the Internet, either via ethernet (Model B) or via WiFi using a compatible WiFi USB dongle. To configure the network access on your Raspberry Pi have a look at this tutorial.

To complete this tutorial you need the following components.

Components Buy Price Quantity
Raspberry Pi (Model B+) Farnell $35.00 1
Edimax EW-7811Un (optional) Amazon $8.00 1
Push button Component packs $0.35 1
Led Component packs $0.35 1
10K Ohm resistor Resistor kit $0.25 1

Software

To program your Raspberry Pi you need to install a compatible GNU/Linux distribution from the Raw Images list section (if new to this checkout this guide) and the following libraries.

Library Notes
paho-mqtt This library enables the communication between Lelylan and the Rasp by creating a MQTT client in Python.
pip install paho-mqtt

Hardware Setup

This schema represents the led, resistor and pushbutton setup. With this setup each time you press the button, the LED is turned on and off.

Lelylan Setup

Open Lelylan Dashboard and create a new device by following 3 simple steps (if you are new to Lelylan, you can sign up for free).

1) Set a meaningful name (e.g. bedroom light).

2) Choose the device type. For this tutorial choose Basic Light.

What is a type? A type defines what a device is by defining its properties, functions and statuses. For this tutorial you do not need to now more about.

3) Choose "Connect with MQTT" as connectivity option.

In this tutorial we'll use MQTT, a publish subscribe protocol for the Internet of Things.

4) Get the Device ID and Device Secret.

Once the device is created, click the settings link (placed under the device name) and get the device ID and device secret. You'll need them in the next section.

Code

Once the (virtual) device is defined on Lelylan you need to make it communicate with the Raspberry Pi. Copy the Python sketch below and change <DEVICE-ID>, <DEVICE-SECRET> and <CLIENT-ID> with your device credentials. Save the sketch in a file named lelylan_light.py and run it as super user: $ sudo python lelylan_light.py.

You are done

Access Lelylan Dashboard and control your connected light from mobile, tablet and desktop. If any problem occours, let @lelylan know.

Code Explained

To better understand how the Raspberry Pi sketch works, follows a brief description of what most important sections do.
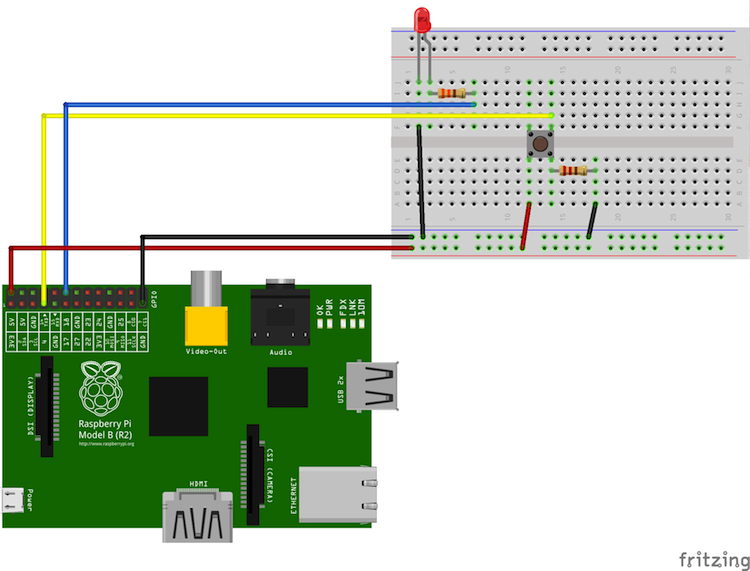
GPIO Setup

Set GPIO mode to BOARD and set pin mode for the led and the button pins. This will import the necessary libraries in the GPIO namespace and set the pin numbering to correspond to your breakout board.
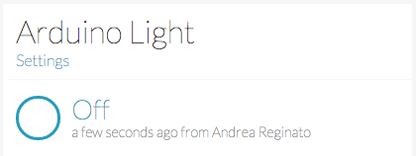
MQTT Callbacks

When a user updates a device status using Lelylan Dashboard a message is published to the topic devices/<DEVICE-ID>/get (in topic) and it's received from the Raspberry PI through the on_message function.

Every message exchanged with Lelylan is made up by a list of properties where each of them contains the property ID and the property value. For the "basic light" type we only have the light status property which has ID 518be5a700045e1521000001 and accepts the values on and off.

What we do is to check the received message and parse the JSON to see if the status property is on or off. Based on this value, the light is turned on or off and a message is sent back to Lelylan to confirm that the physical changes were successfully applied (if not, the device will keep being pending).

Device Credentials

To make the Raspberry PI communicate with Lelylan create a new MQTT client passing a MQTT client ID as param, a random string not longer than 23 bytes used to identify your Raspberry Pi.

The device_id and device_secret are used to authenticate the physical object (Raspberri PI) with Lelylan. To get the device credentials open the Dashboard, select the desired device, click on settings and copy the Device ID and the Device Secret.

Lelylan uses MQTT, a publish subscribe protocol for the Internet of Things. To make Lelylan communicate with Raspberry Pi you need to set two topics: one receiving messages from Lelylan (in_topic) and one sending messages to Lelylan (out_topic). These topics are unique and identified by the device id.

MQTT Connection

Set the Lelylan MQTT server credentials and the MQTT server IP where to connect. Once the connection is completed, the MQTT client subscribes to the in_topic. This way the on_message callback function is called every time a message is received from Lelylan.

Button logic

Here we define the loop function where we use a pushbutton as a switch. Each time you press the button the led is turned on or off. To make it work we need to add a debounce, otherwise everytime you press the button a single press would be recognized as multiple press.

Once the push button is pressed (the led status changes) we publish a message to Lelylan with the updates.

Troubleshooting

Everything should work just fine. If any problem occours mail or Tweet us.

Get inspired

Did you like this tutorial? You could be interested in the following ones.


If you want to learn more check out the Lelylan Dev Center and Lelylan Lab.

Social

If you like our work, let us know on twitter or by sharing the tutorial with anyone you think might find it useful.

Facebook Twitter Google Digg Reddit LinkedIn Pinterest StumbleUpon Email

Thanks

This article is brought to life from the following people. Mail or Tweet us for any idea that can improve the project.